Rails, Angular, PostgreSQL and Bootstrap in 2021: Creating a SPA with Rails and Angular
I’ve been reading the great Rails, Angular, Postgres, and Bootstrap, 2nd Edition
, but I’ve felt the Angular part is a bit outdated (maybe some Rails part too), and I’ve decided to try to build my own version of the stack, with a demonstration app called Kombiz. To get this running, I’ve started reading this tutorial to get this built, because other alternatives, like getting Angular served from app/javascript, didn’t work so well for me.
About the app
Kombiz is a carpooling app, where drivers can propose trips, and passengers can join them, so they can share the expenses. So, it will have entities (and UI screens) like Drivers, Passengers, Trips and so on.
Setting up everything
Angular
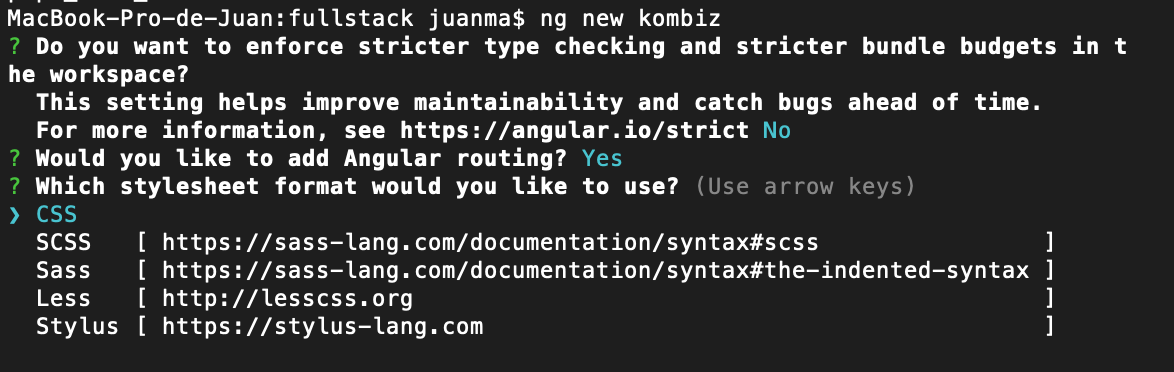
I started the project by creating the Angular app: ng new kombiz. In the interactive prompt, these are the options I’ve chosen:
Strict? no
Routing? yes
CSS? CSS
Rails
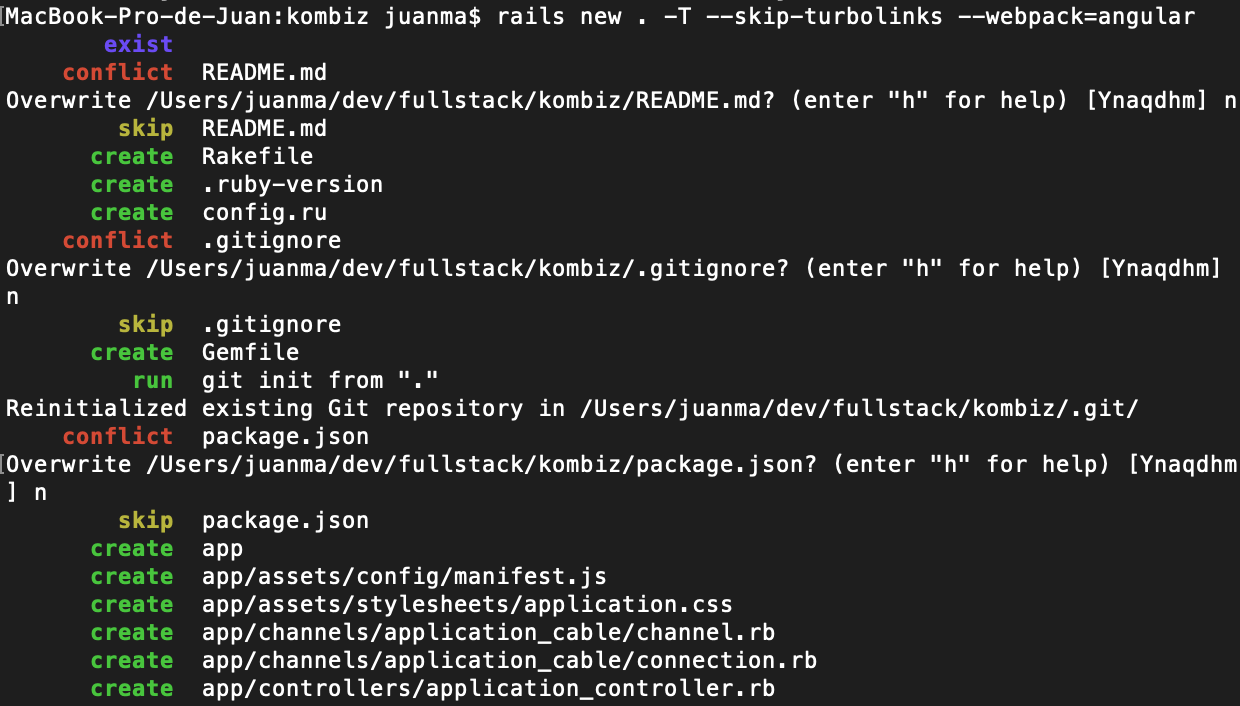
Then, cd kombiz/ and create the Rails app in the same directory: rails new . -T --skip-turbolinks --webpack=angular. Make sure to answer n to all the overwrite questions.
Routing on Rails
Create a controller to handle all the routes
bundle exec rails g controller StaticController
And add this content
class StaticController < ApplicationController
  def index
    render file: Rails.root.join('public', 'index.html')
  end
end
So that Rails renders Angular’s index.html file
Also, the routes file should look like this
Rails.application.routes.draw do
  # Other routes before this
  get '*path', to: 'static#index'
end
Since this is a SPA, we’re going to use Angular Router to do the actual routing, so we only want Rails to serve a single route, the static one.
Getting everything running with Foreman
Add Foreman to the Gemfile
...
# Foreman to launch both Angular and Rails
gem 'foreman', '~> 0.87.2'
...
And run bundle to install the dependencies
Then, create a Procfile file, with this content
client: rm -rf public/* && ng build --watch=true
web: rails s -p 3000
And run foreman start
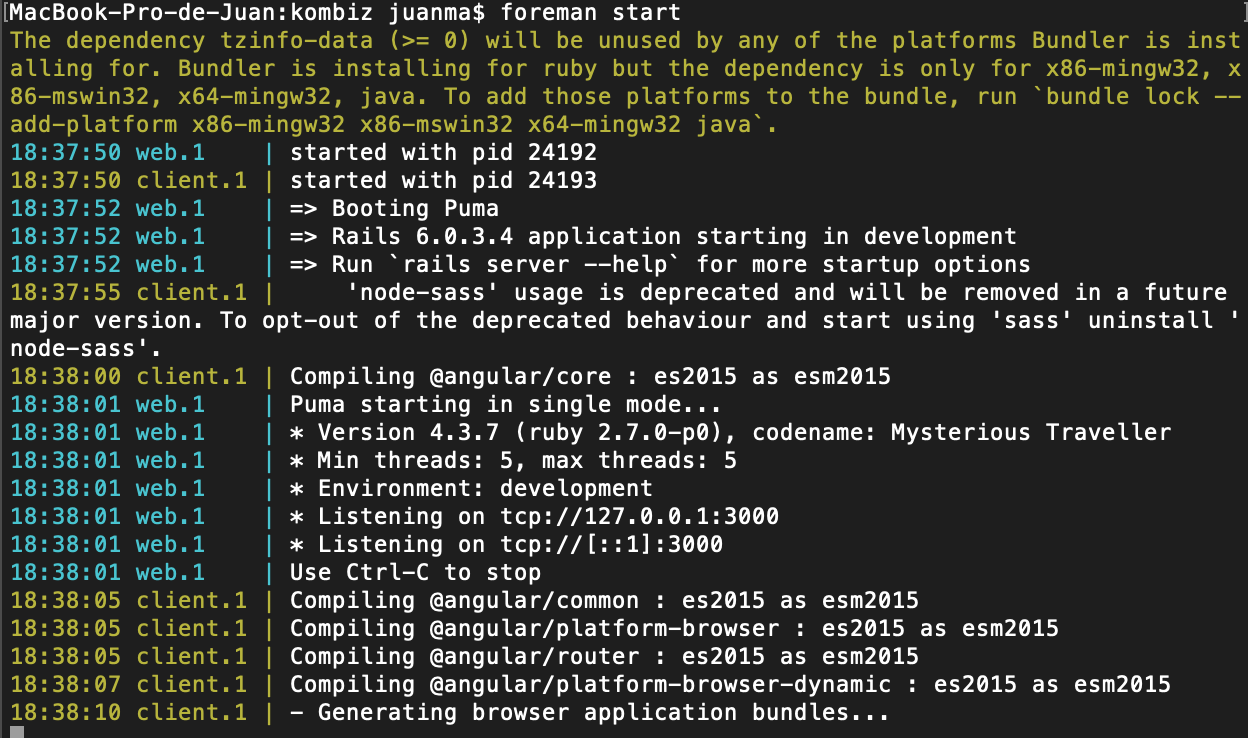
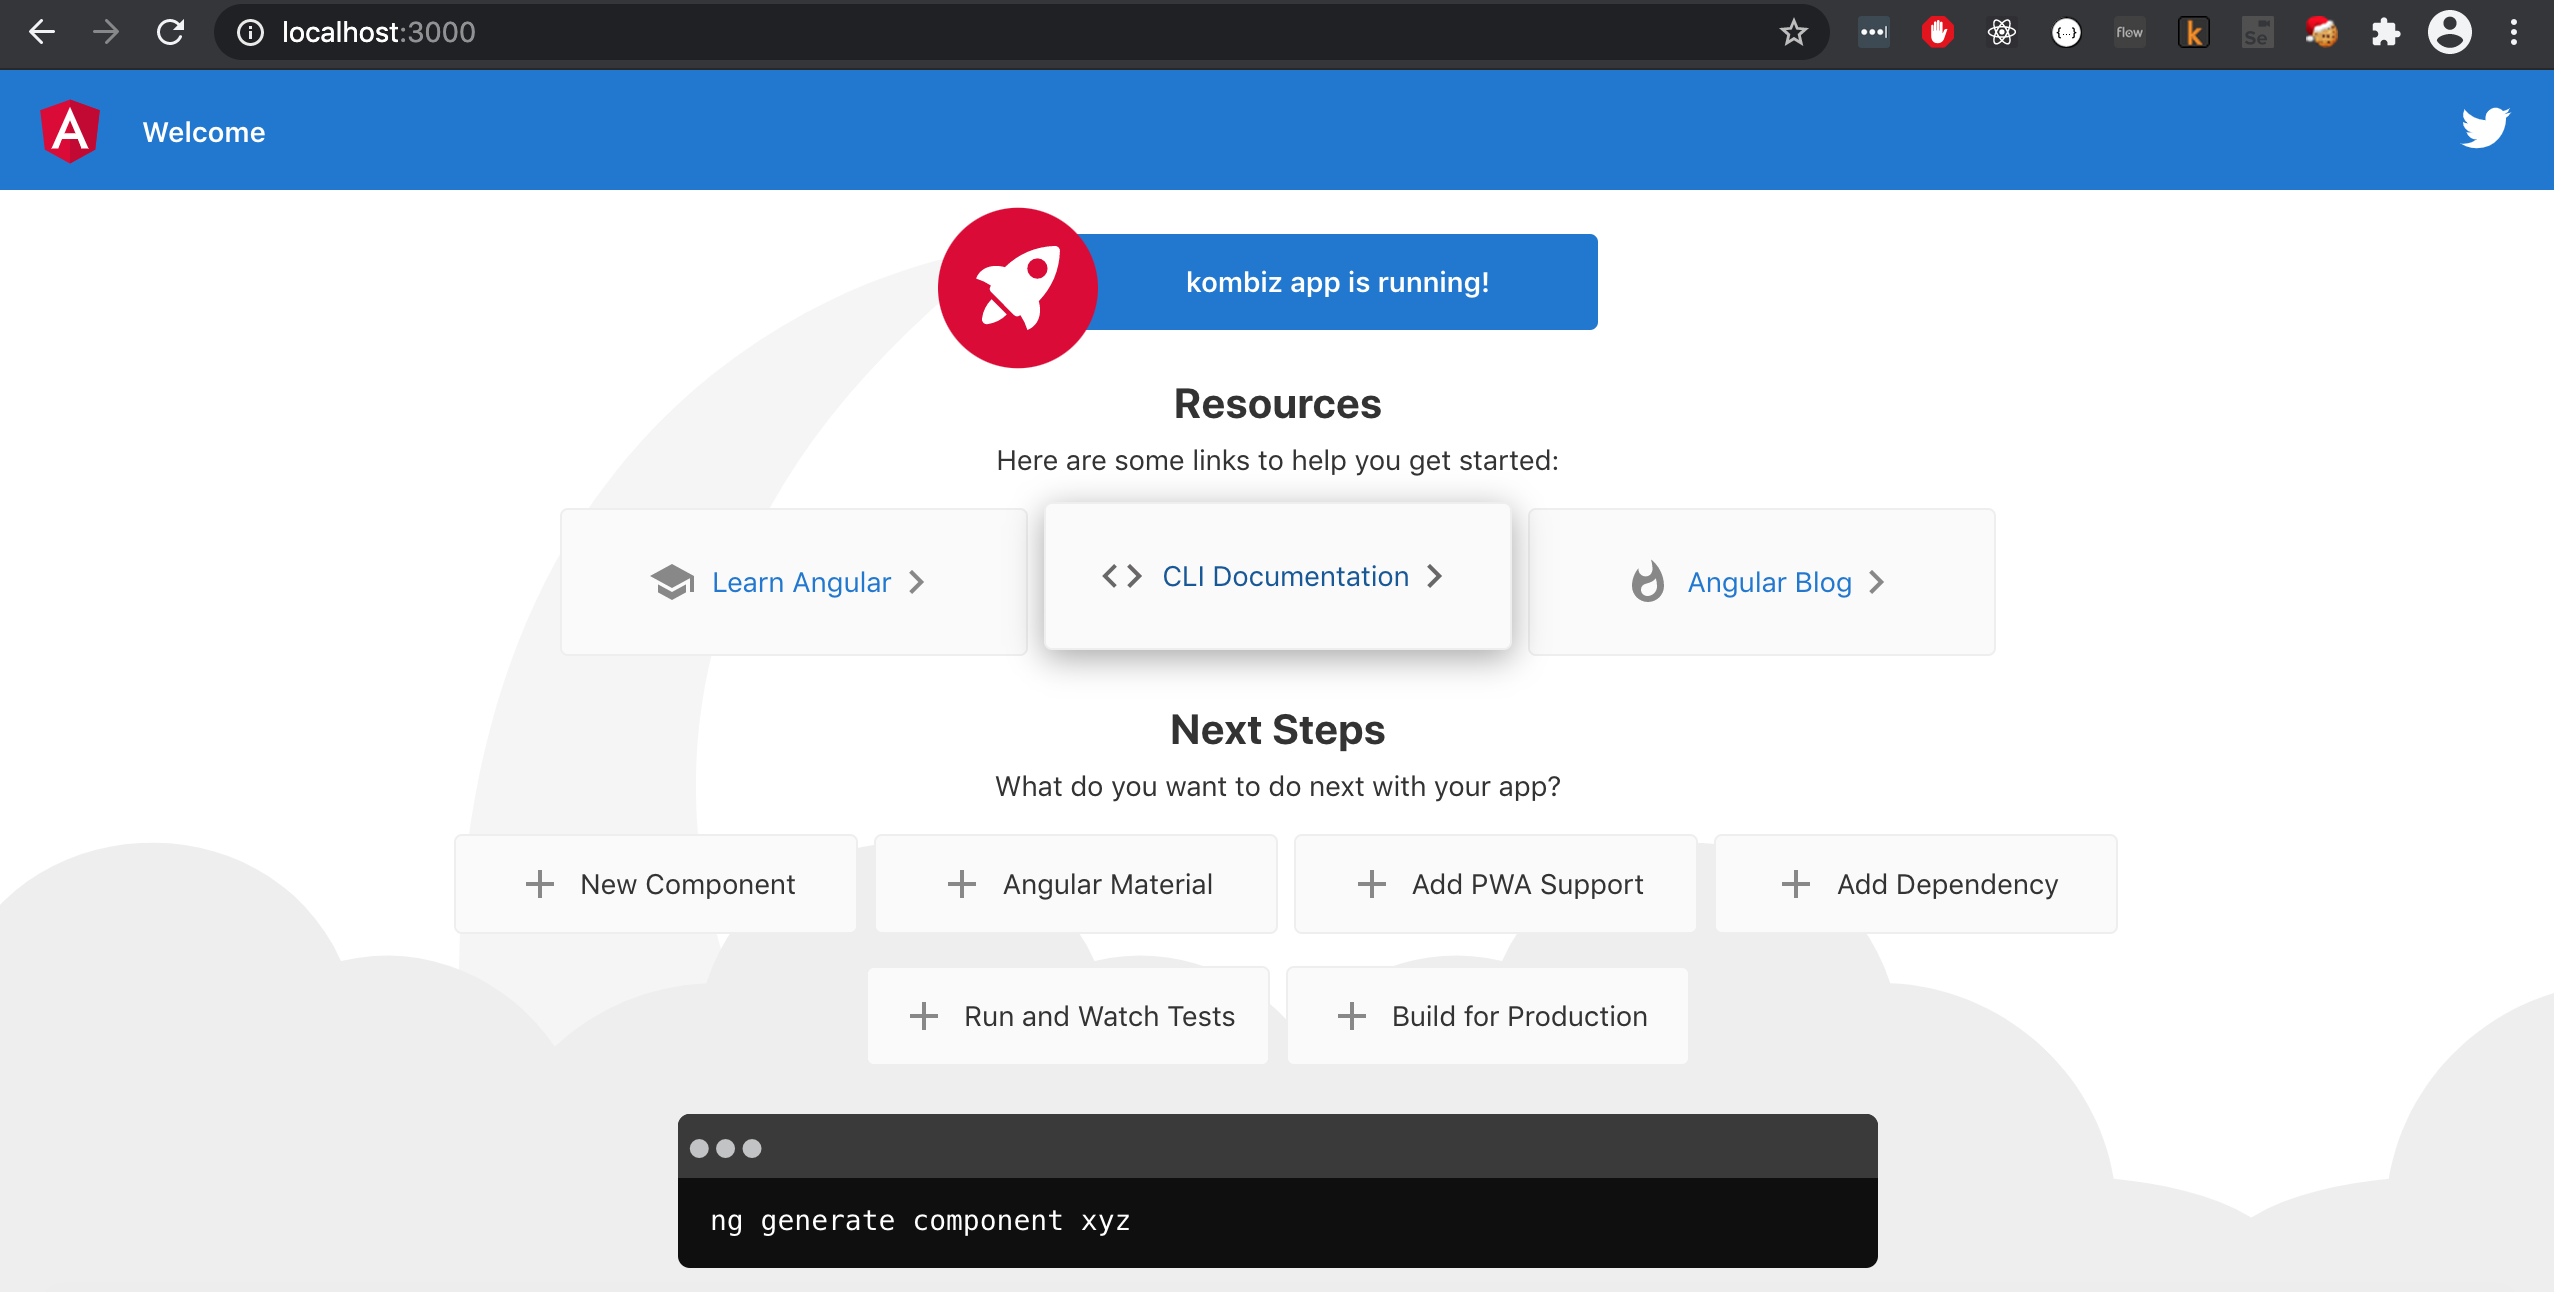
At this point, you should have a running app 🎉! You can verify that it’s working by browsing to http://localhost:3000/
Adding some content in the UI
Since Kombiz is a carpooling app, a Driver is an important entity, so let’s get some drivers shown in our UI.
Creating a component
Create a Component to display our drivers: ng g c driver
This will create all the needed files
CREATE src/app/driver/driver.component.css (0 bytes)
CREATE src/app/driver/driver.component.html (21 bytes)
CREATE src/app/driver/driver.component.spec.ts (626 bytes)
CREATE src/app/driver/driver.component.ts (275 bytes)
UPDATE src/app/app.module.ts (475 bytes)
Showing some data
Let’s create some fake data for now, we’d like to get real drivers from the backend eventually. To do so, let’s follow these steps:
- Create a model class to represent the Driver:
mkdir -p src/app/model
cd app/javascript/coombie/src/app/model
touch src/app/model/Driver.ts
-
Create a service to hold hardcoded data (for now):
ng g s Data -
Add this content to the new service in:
src/app/data-service.ts
import { Driver, DriverStatus } from './model/Driver';
import { Injectable } from '@angular/core';
import { Observable, of } from 'rxjs';

@Injectable({
  providedIn: 'root',
})
export class DataService {
  drivers: Array<Driver>;

  getDrivers(): Observable<Array<Driver>> {
    return of(this.drivers);
  }

  constructor() {
    this.drivers = new Array<Driver>();

    const driver1 = new Driver();
    driver1.id = 1;
    driver1.alias = 'michael92';
    driver1.status = DriverStatus.DRIVING;
    this.drivers.push(driver1);

    const driver2 = new Driver();
    driver2.id = 2;
    driver2.alias = 'GiaCarDriver';
    driver2.status = DriverStatus.IDLE;
    this.drivers.push(driver2);

    const driver3 = new Driver();
    driver3.id = 3;
    driver3.alias = 'MarkZuckerberg';
    driver3.status = DriverStatus.DISABLED;
    this.drivers.push(driver3);
  }
}
- Add contents to the HTML file in
src/app/driver/driver.component.html
<h1>Drivers</h1>

<div>
  <table class="table">
    <thead>
      <tr>
        <th>ID</th>
        <th>Alias</th>
        <th>Status</th>
        <th></th>
      </tr>
    </thead>
    <tbody>
      <tr *ngFor = "let driver of drivers">
        <td></td>
        <td></td>
        <td></td>
      </tr>
    </tbody>
  </table>
</div>
- And to the TypeScript file in
src/app/driver/driver.component.ts
import { DataService } from './../data.service';
import { Driver } from './../model/Driver';
import { Component, OnInit } from '@angular/core';

@Component({
  selector: 'app-driver',
  templateUrl: './driver.component.html',
  styleUrls: ['./driver.component.css'],
})
export class DriverComponent implements OnInit {
  drivers: Array<Driver>;

  constructor(private dataService: DataService) {}

  ngOnInit(): void {
    this.dataService.getDrivers().subscribe((next) => {
      this.drivers = next;
    });
  }
}
Then, get the JavaScript dependencies with: npm i
Some errors
I got this error (on the Rails side)
18:51:53 web.1    | To disable this check, please change `check_yarn_integrity`
18:51:53 web.1    | to `false` in your webpacker config file (config/webpacker.yml).
So, I changed it to false in my config/webpacker.yml file.
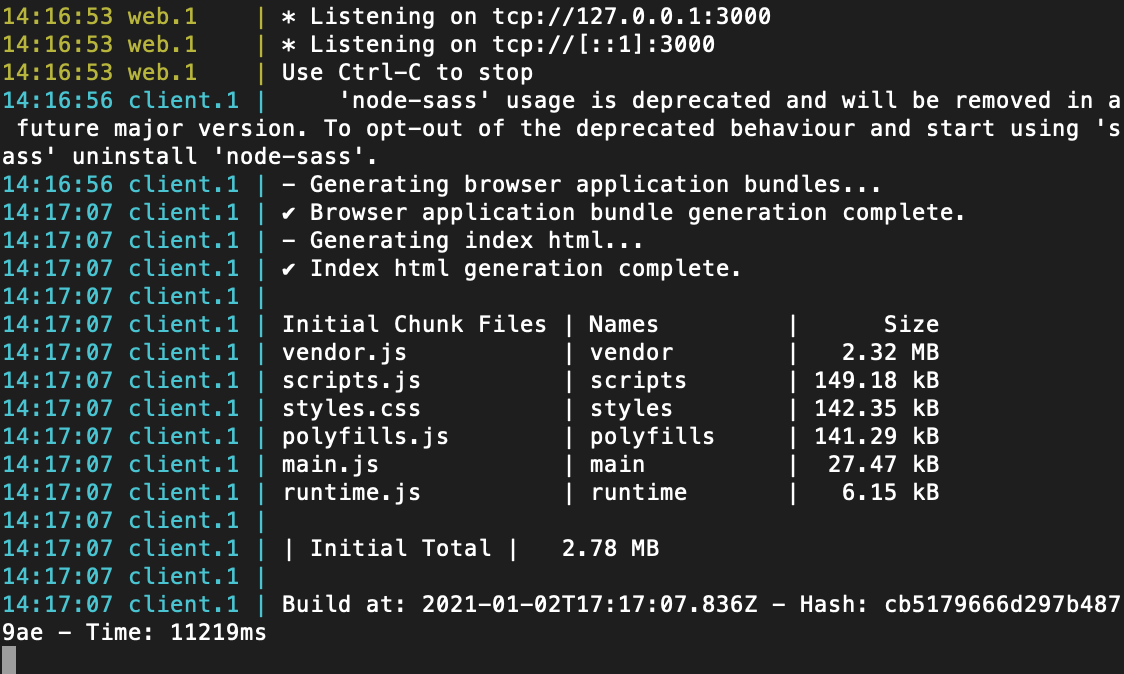
Then, I got a Template is missing, which was solved by reinstalling the dependencies.
rm -rf node_modules/
npm i
Fixing the routes
I had forgotten to add the proper routes, we only have one of them so far. Add this to the empty Array on app-routing.module.ts:
const routes: Routes = [{ path: `drivers`, component: DriverComponent }];
Also, make sure the only content on app.component.html is this:
<div class="container">
  <router-outlet></router-outlet>
</div>
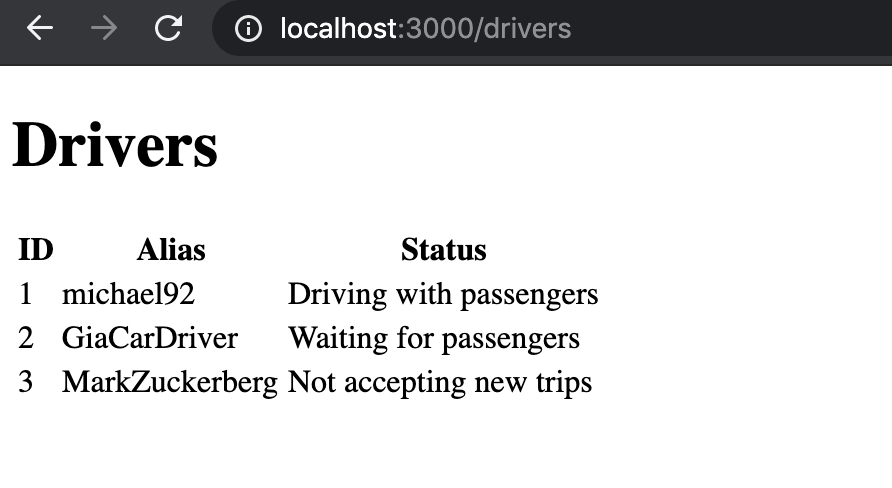
So, after all these code, you should see something like this. Ugh.
Adding Bootstrap
This looks horrible, so let’s add Bootstrap: npm install bootstrap
and also add the styles to the angular.json file:
"styles": [
  "src/styles.css",
  "node_modules/bootstrap/dist/css/bootstrap.min.css"
],
"scripts": ["node_modules/bootstrap/dist/js/bootstrap.min.js"]
I’m not specifying any Bootstrap classes here, you should use the ones you prefer.
Adding Font Awesome
I’m going to add Font Awesome now, so that we can use a few of its icons. To do so, install the free version: npm install --save @fortawesome/fontawesome-free
Add the CSS to the angular.json file, otherwise the icons won’t be rendered:
"styles": [
  "src/styles.css",
  "node_modules/bootstrap/dist/css/bootstrap.min.css",
  "node_modules/@fortawesome/fontawesome-free/css/all.css"
]
Changes in the model
The model class now will look like this:
export class Driver {
  ...
  vehicleTypeEnum: typeof VehicleType = VehicleType; // Hacky way to use the enum on the component
}

...

export enum VehicleType {
  CAR = 'Car',
  VAN = 'Van',
  TRUCK = 'Truck',
}
Add the new field to the datasource, so we get all the possible vehicle types:
...
constructor() {
    this.drivers = new Array<Driver>();

    const driver1 = new Driver();
    driver1.id = 1;
    driver1.alias = 'michael92';
    driver1.status = DriverStatus.DRIVING;
    driver1.vehicleType = VehicleType.CAR;
    this.drivers.push(driver1);

    const driver2 = new Driver();
    driver2.id = 2;
    driver2.alias = 'GiaCarDriver';
    driver2.status = DriverStatus.IDLE;
    driver1.vehicleType = VehicleType.VAN;
    this.drivers.push(driver2);

    const driver3 = new Driver();
    driver3.id = 3;
    driver3.alias = 'MarkZuckerberg';
    driver3.status = DriverStatus.DISABLED;
    driver1.vehicleType = VehicleType.TRUCK;
    this.drivers.push(driver3);
  }
...
The driver.component.html will look like this now:
<table class="table table-striped table-hover">
  <thead>
    <tr>
      <th>ID</th>
      <th>Alias</th>
      <th>Status</th>
      <th>Vehicle</th>
      <th></th>
    </tr>
  </thead>
  <tbody>
    <tr *ngFor = "let driver of drivers">
      <td></td>
      <td></td>
      <td></td>
      <td [ngSwitch]="driver.vehicleType">
        <i *ngSwitchCase="driver.vehicleTypeEnum.CAR" class="fa fa-car-side"></i>
        <i *ngSwitchCase="driver.vehicleTypeEnum.VAN" class="fa fa-shuttle-van"></i>
        <i *ngSwitchCase="driver.vehicleTypeEnum.TRUCK" class="fa fa-truck"></i>
      </td>
    </tr>
  </tbody>
</table>
I’ve used a ngSwitch directive here, because I wasn’t able to add the relevant classes dynamically using ngClass. I don’t know why, maybe the condition I wrote wasn’t the correct one. Anyway, ngIf did the trick.
Adding a 404 page
To add a default 404 page, so that we make sure that all possible routes are properly handled, let’s create a new component
ng g c page-not-found
I found this really simple and cool template that uses Bootstrap, let’s add it to our page-not-found.component.html, making some minor corrections
<div class="container">
  <div class="row">
      <div class="col-md-12">
          <div class="error-template">
              <h1>
                  Oops!</h1>
              <h2>
                  404 Not Found</h2>
              <div class="error-details">
                  Sorry, this page is not available.
              </div>
              <div class="error-actions">
                  <a routerLink="/drivers" class="btn btn-primary btn-lg"><span class="glyphicon glyphicon-home"></span>
                      Take Me Home </a><a routerLink="/drivers" class="btn btn-default btn-lg"><span class="glyphicon glyphicon-envelope"></span> Contact Support </a>
              </div>
          </div>
      </div>
  </div>
</div>
Here, routerLink="/drivers" will redirect to our home component (we don’t have a customer support component yet).
We also need to add this to our routes on app-routing.module.ts:
import { PageNotFoundComponent } from './page-not-found/page-not-found.component';
import { DriverComponent } from './driver/driver.component';
import { NgModule } from '@angular/core';
import { Routes, RouterModule } from '@angular/router';

const routes: Routes = [
  { path: `drivers`, component: DriverComponent },
  { path: ``, component: DriverComponent }, // For now, this is our home
  { path: `404`, component: PageNotFoundComponent },
  { path: `**`, redirectTo: `/404` }, // Wildcard must be at the end, matches all
];
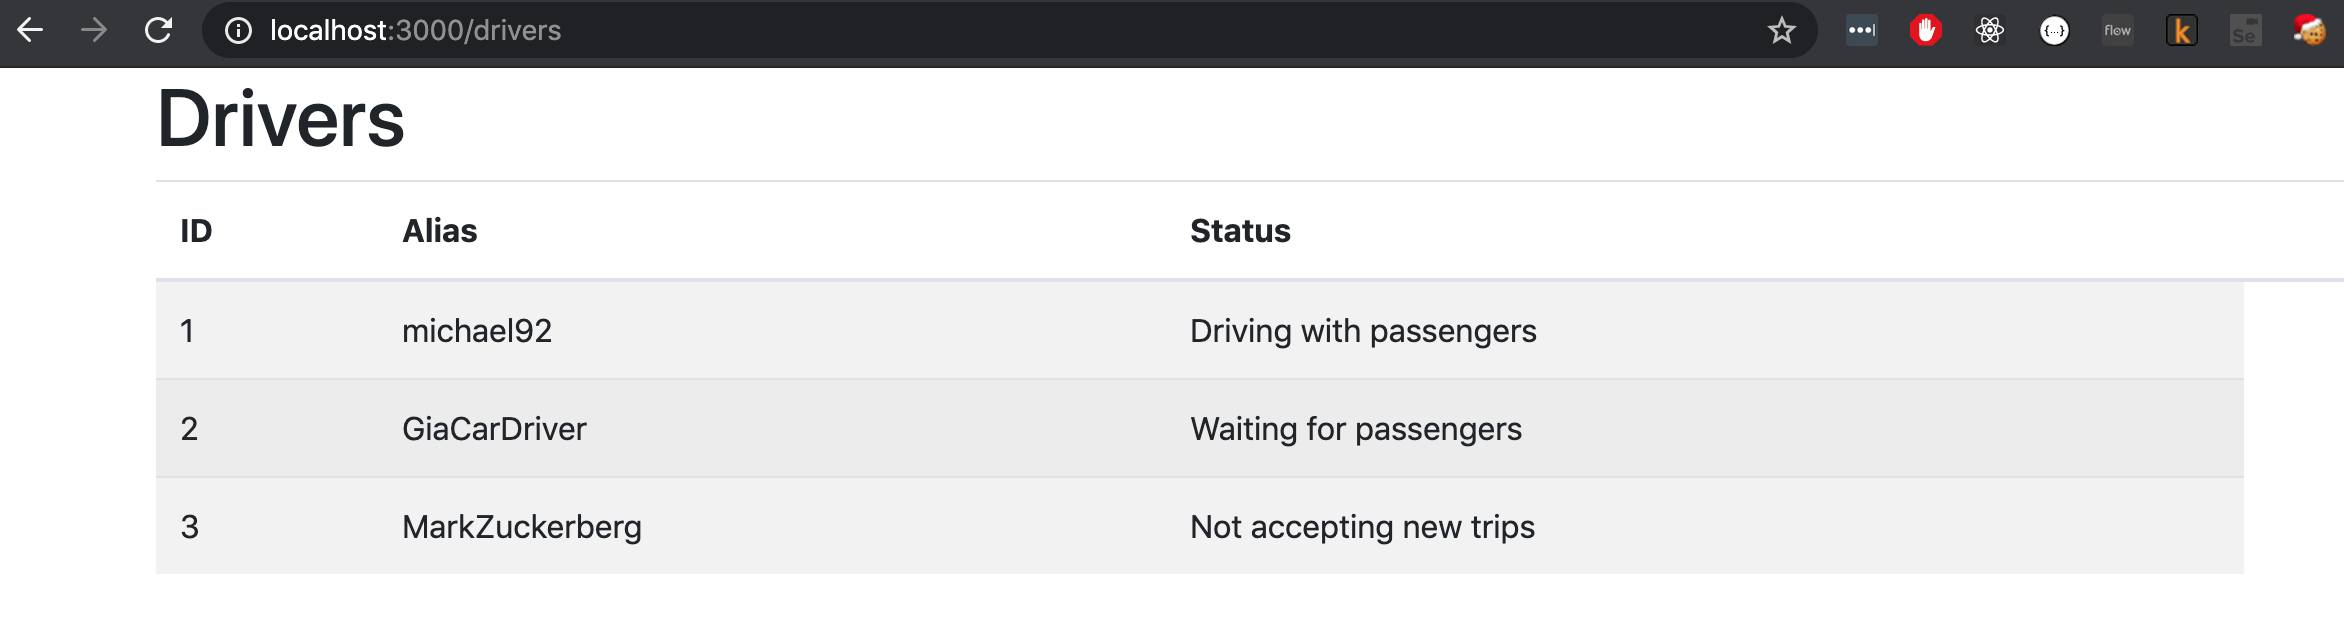
This is how the app looks after adding Bootstrap and Font Awesome
Rails routing errors
If you see an error, where Rails is complaining about finding a template
Missing template Users/juanma/dev/fullstack/kombiz/public/index.html with {:locale=>[:en], :formats=>[:html], :variants=>[], :handlers=>[:raw, :erb, :html, :builder, :ruby, :jbuilder]}. Searched in: * "/Users/juanma/dev/fullstack/kombiz/app/views" * "/Users/juanma/.rvm/gems/ruby-2.7.0/gems/actiontext-6.0.3.4/app/views" * "/Users/juanma/.rvm/gems/ruby-2.7.0/gems/actionmailbox-6.0.3.4/app/views" * "/Users/juanma/dev/fullstack/kombiz" * "/"
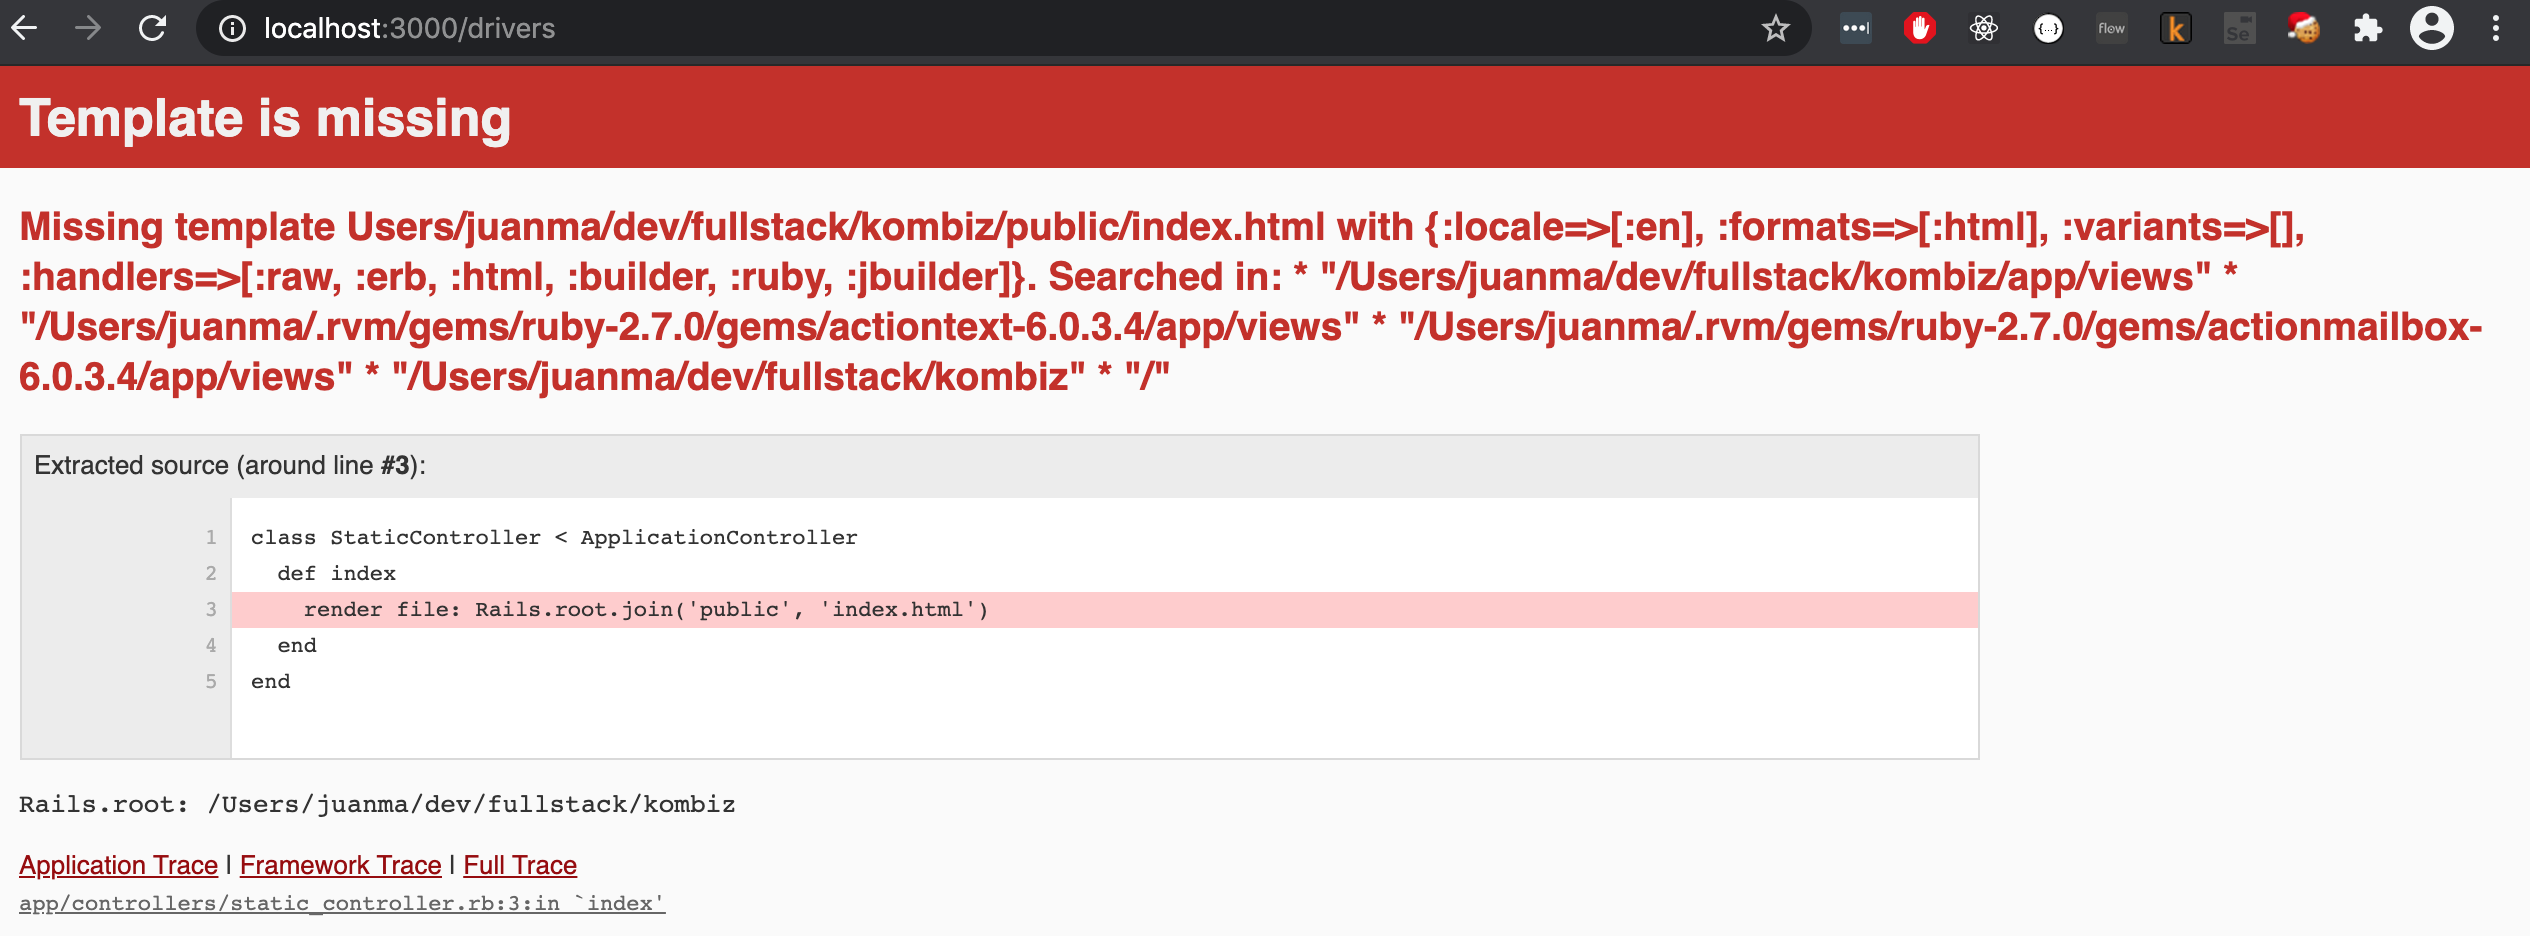
You should wait for the full frontend (the client command) to finish building.
Summary
This was a bunch of code 💣! Hopefully, you followed along, and got your own working version of the app.
I’m not a great fan of this Angular and Rails structure, for several reasons. For starters, it mixes up the folder structure of both frameworks, and it feels as if you’re neglecting some of Rails’ features (like the routing, for example).
Anyway, it was a great starting point for a fullstack app, and it works properly. You can find the code for this example here.